How to Supercharge Your 3D Printer Using a Nintendo Switch and Klipper
Introduction
If you’ve ever watched a 3D printer crawl through a simple Benchy, you know the pain: 90 minutes for a tiny boat. That’s the reality for many stock printers like the Prusa MK3S. But what if you could slash that time to just 8 minutes without sacrificing quality? Sounds impossible, right? Yet that’s exactly what maker Cocoanix achieved—using a Nintendo Switch as the secret weapon. This guide walks you through the process step by step, showing how to harness Klipper firmware on a jailbroken Switch to make your printer scream. You’ll learn how a general-purpose computer can offload complex motion calculations, leaving your printer’s microcontroller to simply drive motors. No magic, just clever engineering. And if you don’t have a Switch handy, we’ll cover alternatives too.

What You Need
- A 3D printer (tested with Prusa MK3S, but most Cartesian printers work)
- A Nintendo Switch (any model, V1 or later)
- MicroSD card (at least 32GB, class 10)
- USB-C to USB-A cable (for printer connection)
- Jailbreak software (e.g., Fusée Gelée, Hekate, Atmosphere)
- Klipper firmware files (from official GitHub)
- Computer with SSH client (optional, for initial setup)
- Patience and a bit of command-line comfort
Step-by-Step Guide
Step 1: Understand the Magic Behind Klipper
Before diving in, grasp why this works. Most 3D printers run firmware directly on a limited microcontroller (like an 8-bit or 32-bit chip). That chip handles everything—motion planning, temperature control, and G-code parsing. Klipper flips this: it offloads the heavy math (like input shaping) to a faster computer (your Switch or a Raspberry Pi). The printer’s board only gets simple commands, so it can run much faster without stuttering. Essentially, you’re giving your printer a smarter brain.
Step 2: Jailbreak Your Nintendo Switch
To run custom software, the Switch must be in Recovery Mode (RCM) and boot into custom firmware. Here’s how:
- Power off your Switch completely.
- Insert a jig (like a paperclip or commercial RCM jig) into the right Joy-Con rail.
- Hold Volume Up + Power to enter RCM.
- Use a PC or phone to send the payload (e.g., Hekate) via USB. Tools like TegraRcmGUI make this easy.
- Launch Atmosphere custom firmware from the Hekate menu.
- Install required drivers and boot into CFW (Custom Firmware) mode.
Tip: If your Switch is patched (V2 or later), this may not work. Check your serial number for vulnerability.
Step 3: Set Up a Linux Environment on the Switch
Klipper runs on Linux, so you’ll install a minimal distribution. Use L4T Ubuntu (a port for Switch) or Switchroot Linux. On your MicroSD card:
- Format the card as FAT32.
- Download the latest Switchroot Linux image (e.g., Ubuntu 20.04 L4T).
- Burn the image using balenaEtcher or similar.
- Insert the card into the Switch and boot to Hekate, then launch Linux from the menu.
- Follow the on-screen setup (Wi-Fi, user account).
Step 4: Install Klipper Firmware on the Printer
You need to flash the printer’s microcontroller with Klipper-specific firmware.
- On your computer (or the Switch itself), download Klipper from GitHub.
- Run
make menuconfigto configure for your printer’s board (e.g., for Prusa MK3S, select AVR, 16MHz, etc.). - Build the firmware with
make. - Connect the printer to your PC via USB, then flash using avrdude or the board’s bootloader method.
Step 5: Connect the Switch to the Printer
Now link the two devices.
- Plug the USB-C end of your cable into the Switch (use a USB-OTG adapter if needed).
- Plug the other end into the printer’s USB port.
- On the Switch, boot into Linux and verify the printer is recognized:
ls /dev/ttyUSB*(usually ttyUSB0).
Step 6: Configure Klipper on the Switch
Edit the config file to match your printer.
- Copy the example config:
cp ~/klipper/config/printer-prusa-mk3s.cfg ~/printer.cfg(or your specific model). - Open the file in a text editor (
nano printer.cfg). - Set the serial path:
serial: /dev/ttyUSB0. - Add input shaping settings (see Klipper documentation). For example:
[input_shaper]
shaper_type_x = mzv
shaper_type_y = mzv - Save and exit.
Step 7: Start Klipper and Tune Accelerations
Launch the Klipper service on the Switch.
- Run
cd ~/klipper && ./klippy.py /printer.cfg -l /tmp/klippy.log. - If successful, the printer’s screen should show communication.
- Use a frontend like OctoPrint (also installable on the Switch) to control the printer from a web browser.
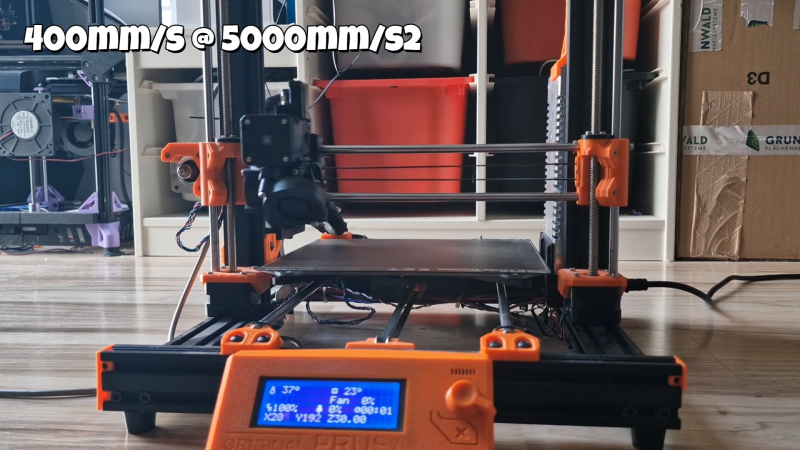
- Print a calibration object (e.g., a small cube) to test speeds. Start with 150% of default, then increase to 200% while monitoring for layer shifts or missed steps.
- Adjust accelerations in the config: higher values (e.g., 5000 mm/s²) work only with input shaping.
Step 8: Run the Benchy Test
Now for the moment of truth. Upload the infamous boat model to OctoPrint, set speed multiplier to, say, 200%, and hit print. Watch your printer dance. If all goes well, you’ll see the finish line in under 10 minutes. Cocoanix got 8 minutes from 90—your results may vary based on printer mechanics.
Tips for Success
- Don’t have a Switch? Use a Raspberry Pi 3B+ or newer; same steps, just easier.
- Jailbreak risks: Unpatched Switches are becoming rare. If yours is patched, consider a Pi instead.
- Input shaping is key: Without it, high speeds cause ringing. Tune using an accelerometer (ADXL345) if possible.
- Cooling matters: Fast printing generates heat; ensure your part cooling fan is sufficient.
- Start conservatively: Don’t jump to 200% right away. Increment by 20% and check quality.
- Battery life: The Switch will run for hours on charge, but keep it plugged in for long prints.